
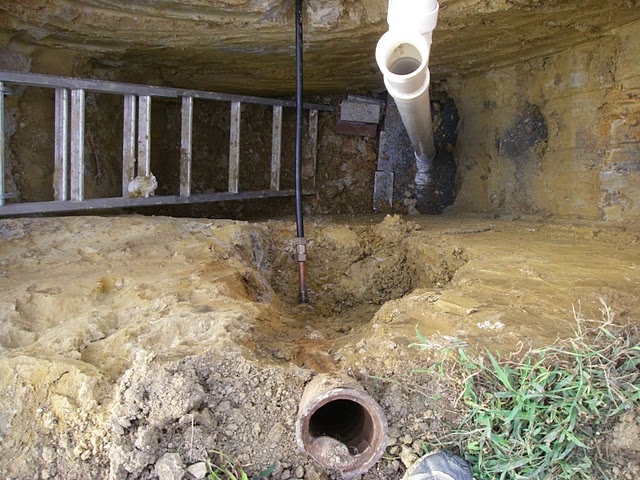
This was the section of floor that was between the bathroom and the kitchen. You can see the pipes that were used for the bathtub, the bathroom sink and the kitchen sink.

The large brown pipe on the right is part of the sewer connection coming from the upstairs 1/2 bathroom. The small brown pipe sticking up out of the ground next to the orange bucket was is the sewer pipe from the downstairs bathroom. This is about to become a very messy job!

Under the concrete slab was a series of terracotta blocks (stacked in upper right corner of this picture). These were installed by the builder as a way to somehow distribute heat from the forced air furnace. It failed miserably. In fact after to speaking to some of our neighbors, we found out the builder was successfully sued over their faulty design. Anyway we had to go through the terracotta blocks to get the ground underneath. As you can see in the picture, when it rains it makes a nice muddy pool of water under the house.

After experimenting with the little section by the sewer pipe we moved on to what will be our master bathroom. In order to put in all new pipes we had to break more floor!

And more floor…

And dig deeper (here’s another shot of the original pipes)…

Finally, we hit ground and removed all the pieces of concrete and terracotta. This excavation will house the master bathroom drain lines.

In order to direct the new pipes out of the house and down into the city sewer line we had to cut s channel through to the front of the house. So...we busted up the floor in the master bedroom!

All the way to the front wall of the house.

We dug deeper and deeper to make sure we had the correct down slope on the pipe from the house to the street.

We hired a couple guys to come out with some shovels and equipment and dig up the front yard since this was a pretty massive excavation.

First they had to get below the foundation to meet the giant hole we made inside the house.

There it is!

They then had to dig a trench from the front of the house all the way down to the city hook up. Here’s Kevin standing in the trench; we were laying pipe inside while the guys finished the trench outside. In the background, you can see the new PVC sewer line protruding out the bottom of the trench.

Once they got to where the original pipes meet the city hook up they had to dig WAY down until we found where the pipes connected.

They maxed out the arm of the backhoe at around 9 ft. This is where the pipe was supposed to be. It was nowhere in sight...darkness was closing in.

So they lowered one of the workers down the hole, and he continued to dig by hand, searching for the water and sewer line. To give you an idea of how deep the hole actually is…the black sneakers on the right of the picture are at yard level. The grey sneakers at the top of the picture are 4 feet below that, in the trench. The guy in the white t-shirt is almost 6.5 feet below that.

Finally – after a whole afternoon of digging up our front yard, we found it! Yeah...there's poop in there. Eww!

Here is shot of the mess we made of the yard from across street.

Next we dug out the soil in the shape of the new bathroom pipes and filled the bottom with gravel. The gravel will help us make sure we have the right amount of slope on each pipe so that the "water" will run smoothly out of the house.

Here are the new pipes. The shower is on the left and the toilet is on the right. The pipe headed toward the lower left is the bathroom sink and the pipe headed toward the lower right is going to the kitchen and what will be the junction of pipes to the upstairs. The pipe that disappears under the concrete heads out of the house in our new trench.

Here’s another angle. The bathroom sink pipe is on the right and the pipe on the left is headed to the kitchen where the old nasty pipes in the first few pictures came up.

Here’s the new sewer pipe running through the master bedroom and out the front of the house.

Back at the giant hole in our front yard Kevin and his dad attached a new PVC pipe to the existing city pipe.
Here you can see the new sewer pipe (the large white one on the right) and the new water line (thin black pipe on the left). The shut off valve from the city connection to the house is located where the pipe is sticking out of the ground at the bottom of the picture.

Here’s the new pipe running through our trench, now connecting the house pipes to the city pipes. Yay!

Here is the new sewer pipe leading to where the upstairs bathroom will be. Next to it is the new water pipe and hose bib. Both of these pipes will be inside the wall separating the kitchen from the mud room.

With the hard part out of the way we filled in the trenches in the concrete slab with all the busted terracotta and concrete.

On top of the broken concrete and dirt we placed a layer of plastic sheeting as a vapor barrier to keep moisture away from the concrete. We placed wire mesh on top of the vapor barrier then drilled and pinned rebar into the old slab around the perimeter. The rebar is used to tie the new concrete in with the old and ensures a strong hold.

We did the same things for the trench in the master bedroom.

We also filled in the trench and the giant hole in the front yard.

Time to call the concrete people! Kevin knocked off some of the sheeting and they pulled the truck right up to the house and in through the front wall. This saved us about 98743957 trips with a wheelbarrow!

We filled the trenches with concrete…and Carson (Dad's Golden Retriever) helped tremendously by supervising the job.

Using 2x4’s and trowels we smoothed out the wet concrete to make sure it was perfectly level with the original concrete.

Perfection!

After smoothing and leveling it out it was time to let it dry. Within 24 hours it’s usually dry enough to walk on. The inside layers of the concrete cure over time and within 30 days it’s strong enough to park a truck on it. We didn’t test that theory though.

All dry! In fact it looks like we never busted it up in the first place. Go team!
The sewer and water line replacement took a lot of hard work and was a very time consuming project we didn’t anticipate. It was a great experience though! One that we never want to do again. Ok, let's be honest...I think it was a great experience because KEVIN and his Dad busted the majority of the concrete and dug 95% of the indoor trenches! Next, we'll show you some major progress with the roof and rear dormer!
2 comments:
There really is only one appropriate comment to make and I am proud to do so.....
HOLY CRAP
Mike
Thanks Mike, somebody HAD to say it! Haha!
Post a Comment